Graphite electrode Control parameters and detection methods of chaser

Aiming at the influence on the processing quality of the graphite electrode thread, this paper analyzes and researches the parameters of the chaser one by one, proposes the control items of the chaser parameters as follows, and formulates the corresponding inspection and evaluation specifications.
(1) Routine testing parameters, a total of 8 parameters: ①tooth top straightness error; ② tooth bottom straightness error; ③ tooth profile half-angle; ④ tooth height; ⑤single tooth pitch; ⑥ tooth bottom width; ⑦ 1 inch cumulative pitch; ⑧ 200 mm cumulative pitch of all internal teeth.
(2) Parameters that are not included in the routine testing items but can provide testing data. There are 4 parameters in total: ① tooth tip radius; ② chaser bevel; ③ flatness of the upper surface of the chaser; ④ flatness of the lower surface of the chaser.
2.1Principles of using Universal Tool-Measuring Microscope
Before measuring various test items, the principle of measurement:
(1) "Abbe measurement principle", that is, in length measurement, the standard length (standard line) is placed on the extension line of the measured length (measured line);
(2) The angle of the rudder plate of the Universal Tool-Measuring Microscope goniometer eyepiece is controlled within 0.5';
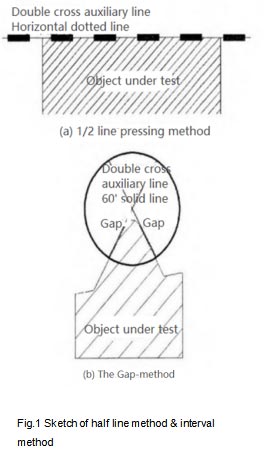
(3) The 1/2 pressure line method is used to measure the length, and the gap method is used to measure the angle, as shown in Figure 1.

2.2 Testing standards and principles
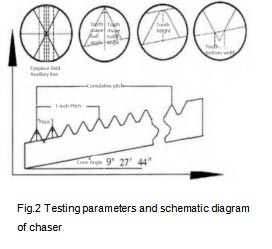
Take the 45-tooth chaser for Ф700 mm (28 inches) T4L electrode as an example. The various detection parameters and the schematic diagram of each parameter are shown in Figure 2.

The detection parameters of the chaser are based on the thread taper angle of 9°27′44″. When the chaser is placed horizontally, the detected parameters should be angle corrected. According to the "Abbe measurement principle", the measured object (chaser) rotate the corresponding angle to keep the measured length consistent with the standard length.
2.3 Detection method
When evaluating chaser, the straightness error of the top/bottom of the chaser can intuitively reflect the quality of the chaser, which affects the straightness of the thread being processed, and also affects the accuracy of gauge detection. Detect the straightness of the tooth top/bottom of the tool, establish a coordinate system, and perform other project tests.
No related results found


0 Replies