Graphite electrode thread production process
Graphite electrode thread production process
According to the design idea, the standard gauge block of the inner taper thread should be processed first, then the inner taper thread should be machined, and finally the corresponding outer taper thread should be machined according to the size of the inner taper thread to form a complete gauge system. The following describes the details of each step one by one.
3.1 Production preparation
According to the design ideas, the following production preparations should be made before production: 1) The machining tools that have passed the universal tool microscope measurement review; 2) Measuring tools such as outside diameter micrometer and platform slider for measuring the outside diameter and the height difference of end face; 3) The machine tool used to process the gauge should be adjusted to the normal working state to ensure that the processing parameters such as coaxiality, perpendicularity, and flatness during processing are within a reasonable range.
3.2 Inner taper thread standard gauge block
The standard block of the inner taper thread can adopt the integral structure or the cross structure. When adopting the integral structure, the flatness of the upper and lower end faces should be ≤ 0.02 mm, the parallelism ≤ 0.02 mm, and the roundness ≤ 0.02 mm; the flatness and parallelism should also be ensured when the cross structure is adopted, and the length difference between the cross and the line should be ≤ 0.01 mm.

3.3 Machining of inner taper thread
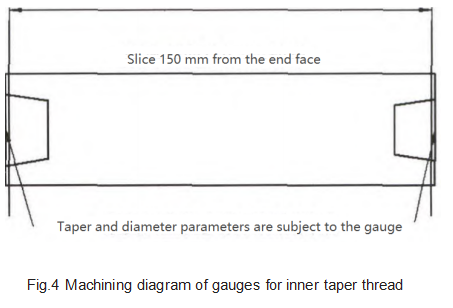
In order to make full use of the existing equipment, the method shown in Figure 4 is used when processing the inner taper thread.
It should be noted that the reference surface of the processed gauge at this time is the circumferential side surface, and the end surface is the auxiliary reference surface. The slices need to be re-grinded and processed to a suitable size before they can be used as a gauge. The diameter of the slice can be slightly larger than the diameter of the standard gauge block to facilitate subsequent processing operations.
3.4 Machining of outer taper thread
When processing outer taper threads, you can first slice the processed thread blanks and screw them to the machined inner taper thread slices, and then use the circumferential side of the inner taper thread slices as the reference to grind the screwed slices as a whole to the final size, a standard gauge block needs to be used to control the diameter parameter twice during this process.
3.5 Lightweight gauge
The finished gauge should be as light as possible under the premise of ensuring its strength. Therefore, the gauge thickness and outer edge width should be kept within a suitable range. At the same time, holes can be processed in the non-important parts of the gauge to reduce the gauge's weight.
4 Actual measurement
When calculating the taper and diameter of the graphite electrode to be measured, it is necessary to measure the relative position between the comparison gauges. At this time, depth vernier calipers or ordinary width vernier calipers can be used, but the above two measurement errors are relatively large, especially ordinary width vernier calipers, due to the measurement surface is narrow, and there is a big problem with measurement repeatability. Therefore, it is recommended to use dial indicator and standard height gauge block for comparative measurement, and the measurement accuracy can reach ±0.01 mm.
Since the surface flatness of the gauge is limited by the processing conditions, its flatness is generally required to be ≤0.02 mm, which is still quite different from the graphite gauge of imported alloy material. Therefore, the above-mentioned various processing and measurement errors must be taken into account when calculating the measurement accuracy. After comprehensive comparison, this article believes that when the deviation of the four points measured by the gauge is less than 0.04 mm, the average value of the four points can be used to calculate the diameter or taper of the graphite electrode and the nipple. The error range of the calculation result is ±5″, the diameter is ±0.006 mm; when the deviation of the four points is not less than 0.04 mm, it is recommended to re-grind the gauge.
No related results found


0 Replies